Thursday, October 31, 2013

Nail Whitening Products- Bubble White vs. Denture Tablets

If you are a regular reader of my blog then you know that I love me some nail polish.  If you are new to my blog welcome, and just so you know, I love me some nail polish.  I have a nice little collection of lovely colors and it is rare that my finger tips are bare.  That being said my nails have taken some abuse with the constant polish changes.  One polish in particular left them extremely yellow after I wore it for a few days.  I didn't take a picture right away but they were nasty.  Here is what they looked like even a few weeks after I took that polish off.  You can see the nice white regrowth and the yucky yellowed tips.

I was fed up with my discolored nails so I decided to do some research on how to whiten them.  I heard good things about an affordable product called Bubble White (bought at Sally Beauty)as well as a cheaper solution using denture tablets (bought at any drugstore).  I decided to try each of these treatments out to see which one worked better at whitening my nails.  Watch the video below to find out what polish made my nails so yellow in the first place and how each of these products worked for me.  Then check out the before and after picture below as well.


Here are the results with the Bubble White
As you can see they are visibly brighter and less yellow.  I wouldn't call them "white" but this product did make a difference.  They recommend using it once a week and I do believe that a second treatment would have done even more whitening. 


And here are the results using the denture tablets
My nails on this hand were less yellow to start with so it is harder to tell if the denture cleaning tablets did anything.  They are a tad less yellow but that is only if you are really looking closely at some of the areas on my middle finger and pinky.  Again repeated weekly use may yield better results.

Final thoughts:  Both products were easy to use, had a pleasant smell,  and left my nails and cuticles clean and soft.  The denture tablets took longer (15 min.) but were cheaper ($1 for 16) and less effective.  The Bubble White was more expensive ($2.49) but faster to use (5 min.) and more effective with just one use.  If I ever need to use a nail whitening product again I would chose the Bubble White.

What do you think of my results?  Have you tried either of these products or any other nail whitening treatments?  Let me know in the comments here or on my video.

I'm off to paint my nails...again!


Sunday, October 6, 2013

15 uses for a Spoolie aka Mascara Wand

You will never look at your mascara wand the same again!

I love finding ways to reuse and re-purpose things especially if it makes my life a little bit easier.  These tips will do just that for you in your beauty routine and around the house using an old mascara wand.  I saved my wand when my mascara was used up and cleaned it with makeup remover and soap and water.  You can buy disposable spoolies at beauty supply stores and online as well.

Watch my video below for all of the tips:

If you are like me and want to be able to jot them down for future reference here is a short list:

15 uses for a Spoolie aka Mascara Wand    
  1. De-clump your mascara
  2.  Remove dry mascara smudges
  3. Assist in eyebrow grooming and trimming
  4. Comb in brow color products
  5. Tame your brows with spray or gel
  6.  Exfoliate lips
  7. Hair color touch ups
  8. Tame fly-aways and baby hairs 
  9. Cuticle remover and exfoliator
  10. Nail art
  11. Clean your nails
  12. Jewelry cleaner
  13. Clean hair dryer lint 
  14. Clean tile grout and hard to reach areas around sinks, etc.
  15. Clean computer keyboards and other nooks and crannies
There are probably a million more things you can do with a spoolie.  What are your ideas?
Thanks for visiting my blog and happy re-using! 

Tuesday, October 1, 2013

Day 31 in the 31 Day Nail Art Challenge

Day 31- Recreate your favorite mani from another blogger

Phew!  I made it to the last day of the challenge!  It has been very fun but quite a bit of work as well.  I admire the people who do blogs and nail art as a living.  So for today's challenege...
 
When I first saw this nail art on Pinterest I thought it was just hilarious.  It comes from Freestyle Nails Tumbler Page. She calls this her "I Pity the Fool" nail art. 

 I watched the A-Team and Rocky III growing up and always had a strange fondness for Mr. T and his crazy hair and exorbitant amount of  gold jewelry.  I never thought of recreating this nail art though until this challenge came along. Mine came our much more cartooney but I still had fun doing it.


The colors and tools I used are OPI San-Tantonio, Rimmel Black Satin, a black striper polish, brush, dotting tool, gold chain from Born Pretty Store, and gold nail art stickers from Kiss.


Thanks for visiting my blog and joining me for this 31 Day Nail Art Challenge.  Be sure to check out all of the other looks I did in the previous challenges and follow my blog for future nails of the day, reviews, and more.

Monday, September 30, 2013

Day 30 in the 31 Day Nail Art Challenge

Day 30- Inspired by a Tutorial

I have had this picture tutorial pinned on my Pinterest page for a long while now.  It is from someone named Manal S. at naildecor on Instagram.  Check out her tutorial HERE on how to create a peacock feather.  

Here is my recreation:
 The above are taken with indoor lighting and the below are taken with natural light.


I smudged the crud out of the thumb nail.  Sad face time!  That's what I get for trying to take pictures too quickly.

For colors I used similar ones to the ones she used in her tutorial.  The blue nails are OPI Fly and Essie Go Overboard.  The bronzy color is Hard Candy Beetle.  The nude base is Wet n Wild Private Viewing.  The feather is done with a matte black Salon Perfect striper and a gold one from LA Colors Art Deco.

I love me some peacock feather nails.  Super easy and cute!
See you tomorrow for the final day of the challenge.

Sunday, September 29, 2013

Day 29 in the 31 Day Nail Art Challenge

Day 29- Inspired by the Supernatural

This is another challenge that I have had planned since the beginning.  I pinned a cute Sugar Skull nail art design ages ago and now I get to try it for myself.  I have a crazy fondness for sugar skulls and other Dia de Los Muertos (Day of the Dead) themed things.  This holiday celebrated in Mexico is fascinating with its traditions of honoring the deceased (hence the "supernatural" element for me).  All of the colors and the flowers and the art and the music are just amazing.  And don't even get me started on the food.  I still remember the best carne asada tacos I ever had from a taco truck in Ensenada...drool!  I am pretty sure that I was Mexican in my previous life because I have such a fondness for the culture and the people.  
Anyway, as usual I am babbling so onto the nails...


 I used a white LA Colors polish, Black Pearl from Wet n Wild and a variety of striper polishes from Jordana and a nameless brand.  The dotting tools and sliced fimo cane flower wheel are from ebay.
  I absolutely adore these nails!  I love the flower eyes and the big white teeth and the little cheek dots and the colors and everything about them.  I wish that I could have this on my nails all day everyday!

Thanks for stopping by.  I may need to go get some Mexican food now with a bunch of cilantro and lime on top...

See you next time!  Only 2 days left to go in the challenge!

Saturday, September 28, 2013

Day 28 in the 31 Day Nail Art Challenge

Day 28- Inspired by a Flag

Can I just say what the what with this challenge!  A flag?  Really?  I had the worst time deciding on a flag to paint on my nails.  The US flag is well overused, as are any kind of cool pirate flags, and most state flags are either lame or have way too many things going on in them.  I was at a loss until I remembered a flag that I bought for my dad a few Christmases ago.  He actually has a flag pole at his little beach bungalow and was looking for cool flags to fly there.  I have Irish heritage in my family so I got him this Irish flag that says Erin go Bragh.  It translates to something like "Ireland Forever".
 I like the simplicity of the green and gold colors on this flag.  There are several versions or drawings of the flag online.  This image came from Wikipedia and I like the cleaner drawing of the angel harp lady and the white accents in the shamrocks on this flag.  I decided to recreate the shamrocks on my nails today. And yes I took the easy way out; I had no time or energy this late in the challenge to attempt the lady, the harp, or the lettering. 
I couldn't quite find the right color of green to match the flag that didn't have shimmer in it so I just used Sinful Colors Envy and a yellow striper from Jordana.

Thank you for stopping by and
 IRELAND FOREVER!

Square Hue Nail Polish Subscription Box

Square Hue Box

There are several monthly nail polish subscription boxes floating around out there these days.  I was subscribed to one of them last years for several months.  I won't name any names but the bottles are very small for the price, the quality is not great, and I found that the colors were not very unique to my collection.  Needless to say I ended my subscription with them and have been keeping an eye out for something new and exciting.  I think I have found it!  

This company is called Square Hue. They are a US based company that make awesome nail polish.  Not only is the bottle super cute and unique but the 3 polishes that you get in your monthly subscription box are great quality, unique colors, and on trend for the month you get them in.  They go on smoothly and wear great on the nail as well.  The cost is $14.99 a month plus shipping and handling and they ship to the US and Canada.  These nail polishes are well worth the price for the 3 limited edition .5 fl.oz. bottles.  Watch the video below that I made for the full details:

Below are some pictures of some recent manicure I have done with the polishes.  I just love the colors individually and how they look together as well.  
 Natural light
 Indoor light
Indoor lamp light
Natural light

If you are a nail polish addict/love/collector like me then you might want to check this company out.  I am very happy to have found them and am very excited to see what will be in next month's box.
Thank you for visiting my blog.  Let me know if you give Square Hue a try. 

Happy Nail Painting!

Friday, September 27, 2013

Day 27 in the 31 Day Nail Art Challenge

Day 27- Inspired by Artwork


I was inspired by the artwork of Roy Lichtenstein for today's challenge.  He is well known for his pop art images and comic book art.  The comic book nail art look inspired by Lichtenstein is very popular.  I want to try it myself sometime but today I chose one of his other works entitled Still Life 1968.

I think this is supposed to be his funky interpretation of flowers in a vase but who knows.  The colors, dots and swirls are what I like about it.  The green, yellow, white and black are nice together as well.

Thank you for stopping by and come back tomorrow for another challenge.

Thursday, September 26, 2013

Day 26 in the 31 Day Nail Art Challenge

Day 26- Inspired by a Pattern

For today's theme of "inspired by a pattern", I chose to do plaid.  Plaid is something I have always wanted to try on all of my nails.  I have done an accent nail before but never the full set of nails.  I wasn't looking at a certain pattern or anything but I did want to use my light blue polish.  Gray, black and white seemed to be the best colors to go with it.  Here is what I came up with:


 I used Wet n Wild Wildshine polish in French White Creme and Teal Slowly and See.  The grays are Sally Hansen Wet Cement and Sinful Colors Smokin.  I also use a strper polish from Salon Perfect and 2 nails art brushes (from ebay).

 I have some work to do on getting straight lines consistently (especially using my left hand).  Even so, I think it looks very cute and very Fallish since it reminds me of a cozy flannel shirt or blanket.  I can't wait to try this in other colors too.  Maybe pink and brown plaid would be fun or the traditional red and black ....We'll see!  Until next time :)

Wednesday, September 25, 2013

Day 25 in the 31 Day Nail Art Challenge

Day 25- Inspired by Fashion

I knew I wanted to do my nails like this the second I saw these awesome shirts in the latest issue of US Weekly magazine. They are from designer Lauren Moshi's Diamond Tongue/Lips line.  I love the bold, funky design and really who doesn't want a big pair of lips with a sparkly tongue on their body somewhere.

This designer has some very cool items in her line including many with my favorite motifs like skulls, anchors and bows.  I love the casual kinds of t-shirts she uses too.  Who says you can't be comfy and stylish?  Certainly not me!  Comfort is the first thing on my list when it comes to clothing.  Alright...on to the nails.

 I like the look of the clean white nails and then...BAM!  You have the crazy diamond tongue and lips right there. Here they are up close:

 I used all Wet n Wild polishes: French White Creme, Black Pearl and Red Red. I mixed the red and white for the pink on the lips. The striper in from Salon Perfect and the rhinestones are from Mash.  I applied the rhinestones with a clear polish and dotting tool.  The dotting tool and brush are from ebay.

These photos were taken with artificial light to show the bling factor of the rhinestone tongues.


I had so much fun with these nails today.  Have fun with your fashion and your nails today too!

Tuesday, September 24, 2013

September Birchbox and Ruffian Manicure Tutorial

September Birchbox
If you missed the video of my September Birchbox you can watch it below.  I got some fun products in this month's box as well as with my Birchbox points.

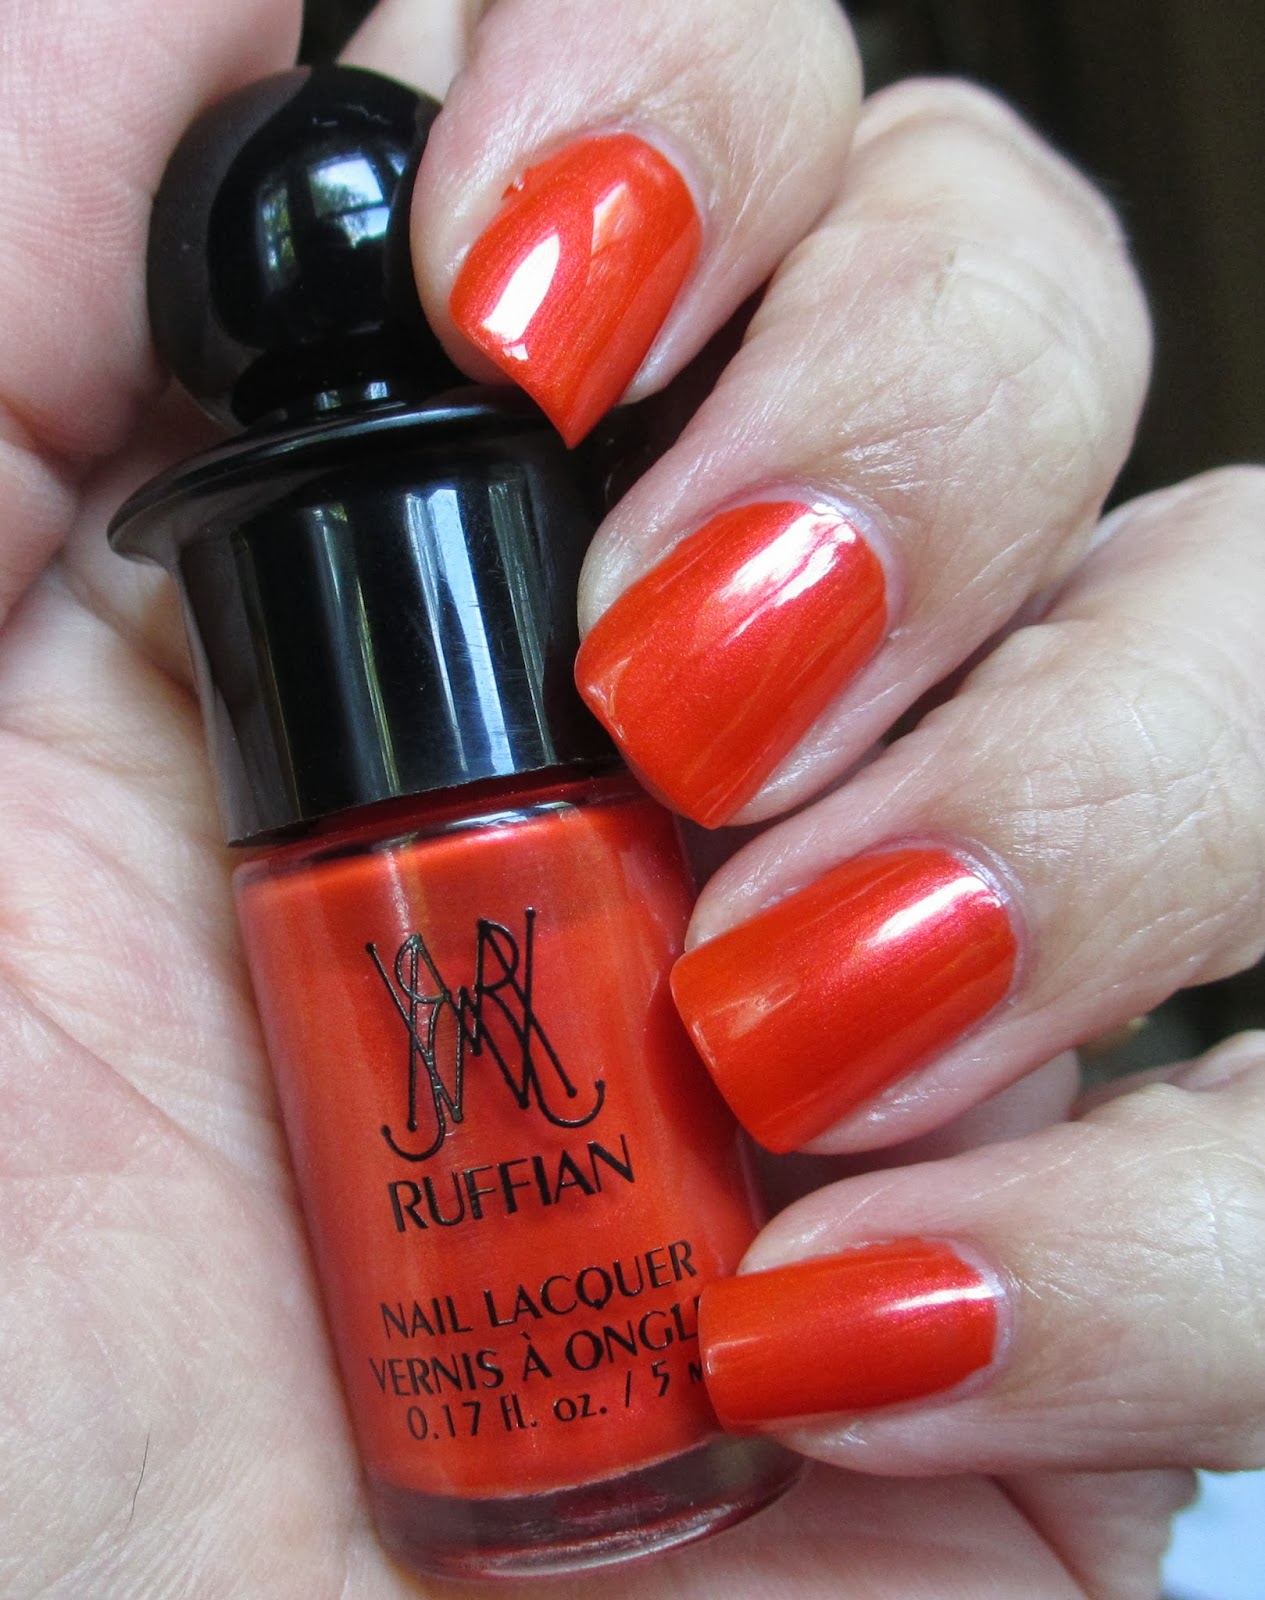
One of the products inside was a cute little nail polish from Ruffian's new nail polish line.   It is a super juicy orange with a beautiful shimmer to is called Fox Hunt (watch the video to see why I was especially excited about the color name).  Pictured below is the polish bottle with its unique rounded cap.  It is very easy to hold on to and the brush is a good shape and size as well.


 It is hard to capture the beauty of this color on camera.  It is so shimmery and has a pinkish pearlesence in the bottle and on the nail.  Depending on the light it can look like a dark shimmery orange or a bright orangey-red.  I am so happy to have this color for Fall.  It will let me get away with a bright, shiny color that still goes with the color scheme of the changing leaves, pumpkins and of course Halloween.  This is how I wore this polish...

Quick Tutorial

The Ruffian manicure style is usually done with 2 contrasting colors that are overlapped but leave a half moon shape at the base of the nail.  I wanted to show you how to do a similar look with just one polish and some nail stickers.  Here are the materials I used:
 The nail stickers came from Born Pretty Store. 
You can find similar stickers from brands like Kiss or Broadway Nails and on ebay, Amazon, or at beauty supply stores like Sally Beauty.

The first thing I did was to paint a base coat on my nails.  Then I applied 1 coat of the Ruffian Fox Hunt nail polish.
Not only does this polish go on extremely smoothly but it has amazing coverage with just one coat as pictured below.
 Wow!  Just one coat for full opacity and vibrant color.  I was impressed for sure.  I went ahead and did a second coat out of curiosity.  As you can see in the picture below it is maybe a tad darker with a second coat, but you sure don't need to do one.
The next step in this Ruffian manicure is to trim the nail sticker to size.
 Then as shown in order below you simply:  center the sticker at the base of the nail being sure not to touch the cuticle, press it down firmly (I just used the tip of the scissors), and add a fast drying topcoat.


 This could not be more quick and easy to do and it came out super cute.  The first picture below is taken in natural light while the second one is taken under artificial light to really showcase the shimmer and depth that this polish color has. (you can click on any picture to make it larger)

 I just love how these nails came out.  You could do a Ruffian manicure with so many different color combinations or try all kinds of nail stickers like these ones to spice it up.  I want to try using a creme purple or navy blue with this color next time.
Be sure to check out Birchbox and the Ruffian nail lacquer collection HERE.  You can't find these polishes anywhere else just yet.
Thanks for stopping by and let me know if you try this fun nail look.